Difference between revisions of "Scripting Create Models"
| Line 593: | Line 593: | ||
[[Image:Example4.png]] | [[Image:Example4.png]] | ||
| − | ===Example | + | ===Example 6: A layered textile=== |
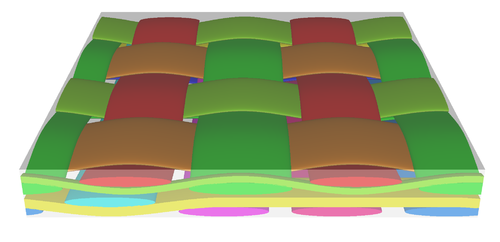
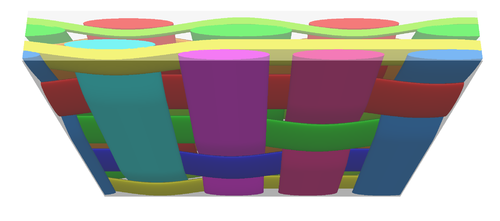
This example shows how two textiles can be combined into one textile using the CLayeredTextile class. | This example shows how two textiles can be combined into one textile using the CLayeredTextile class. | ||
Revision as of 10:43, 28 October 2014
Example 1: A plain weave
First of all, a Python script is just a plain ASCII text file with a .py extension. To create one simply open up your favorite text editor. Notepad will do if you have nothing else but I suggest a more powerful freeware text editor like PSPad or Notepad++. Code that goes into the python script will be displayed like so:
# All Python code will be shown in a box like this one.
# Lines begining with a '#' character are comments
In this example, we will create a simple 2x2 plain weave model with a Python script. Its time to dive in and see some actual Python code. At this point if you are completely lost please refer back to the resources on Python programming. The first step is to create an instance of the CTextileWeave2D class and give it a name, weave:
# Create a 2D weave textile
weave = CTextileWeave2D(2, 2, 1, 0.2, True)
The CTextileWeave2D class takes 5 parameters in the order shown below:
- Number of weft yarns in the unit cell
- Number of warp yarns in the unit cell
- Spacing between the yarns
- Thickness of the fabrics
- Refine model (True/False)
The only parameter that really needs an explanation here is the Refine model option, this controls whether or not the interference correction algorithm will be applied to keep the yarn volumes from intersecting which is a common problem. The interference correction algorithm generally does a good job but is not instantaneous so sometimes it can be beneficial to switch it off.
This is the bare minimum information necessary to create a 2D woven fabric. In the following steps we will add more information to create the model the way we want it.
Let's set the weave pattern, this determines whether a warp or weft yarn will appear on top at a particular cross over. Cross overs are arranged in 2d grid where the size of the grid depends on the number of warp and weft yarns created. To swap the positions of the weft and warp yarns, we call the function SwapPosition with the grid coordinates of the cross over. In order to create a plain weave we need to do this on two diagonally opposite cross overs like so:
# Set the weave pattern
weave.SwapPosition(0, 0)
weave.SwapPosition(1, 1)
Now let's add our weave model to the database of models so that TexGen can render it:
# Add the textile
AddTextile(weave)
Thats it! This is a very simple script but it will generate a plain weave model. To recap your Python script should look like this:
# Create a 2D weave textile
weave = CTextileWeave2D(2, 2, 1, 0.2, True)

# Set the weave pattern
weave.SwapPosition(0, 0)
weave.SwapPosition(1, 1)

# Add the textile
AddTextile(weave)
Save it to disk as PlainWeave.py or give it whatever name you want as long as it has a .py extension.
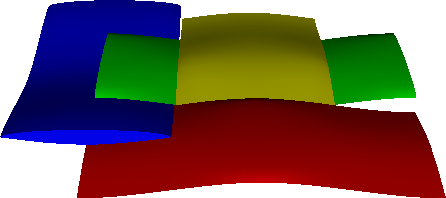
In order to test the Script we need to load it into TexGen. So start up the TexGen GUI and from the Python menu select Run Script. Select the file you have just saved and click ok. With a bit of luck you should see a 2d plain weave on screen:
Congratulations you have created your first TexGen Python script!
Example 2: Another plain weave (the hard way)
In the first example we made use of the CTextileWeave2D which is the reason the script is so compact. This was great for creating a 2D Weave, but what if we want to create something other than a 2D Weave? Well, let's stick to the 2D weave for now but in this example we will create geometric model in a generic way without the use of the CTextileWeave2D class. This takes a little bit longer to do, but gives more control over the final geometry.
First we will define a general textile and call it Textile:
# Create a textile
Textile = CTextile()
The CTextile class doesn't take any parameters, instead yarns will be created and added to it. Next we will create 4 yarns to go inside our textile, it is convenient to make use of the Python lists to do this. Create a list called Yarns with 4 elements, each one an instance of the class CYarn:
# Create a python list containing 4 yarns
Yarns = [CYarn(), CYarn(), CYarn(), CYarn()]
Yarns now contains 4 empty yarns. Note that the yarns are not currently associated with the Textile, first we must fill in the details then make them a part of the textile. The first thing to do is define their paths with nodes. This is done like so:
# Add nodes to the yarns to describe their paths
Yarns[0].AddNode(CNode(XYZ(0, 0, 0)))
Yarns[0].AddNode(CNode(XYZ(0.22, 0, 0.05)))
Yarns[0].AddNode(CNode(XYZ(0.44, 0, 0)))

Yarns[1].AddNode(CNode(XYZ(0, 0.22, 0.05)))
Yarns[1].AddNode(CNode(XYZ(0.22, 0.22, 0)))
Yarns[1].AddNode(CNode(XYZ(0.44, 0.22, 0.05)))

Yarns[2].AddNode(CNode(XYZ(0, 0, 0.05)))
Yarns[2].AddNode(CNode(XYZ(0, 0.22, 0)))
Yarns[2].AddNode(CNode(XYZ(0, 0.44, 0.05)))

Yarns[3].AddNode(CNode(XYZ(0.22, 0, 0)))
Yarns[3].AddNode(CNode(XYZ(0.22, 0.22, 0.05)))
Yarns[3].AddNode(CNode(XYZ(0.22, 0.44, 0)))
We have added 3 nodes to each yarn creating a woven pattern. The number in the square brackets after Yarns refers to a particular yarn in the list. The function AddNode is then called for the yarn. The function takes an instance of the class CNode which in turn is constructed with an instance of the class XYZ representing the position of the node. The class XYZ is constructed with 3 numbers representing the X, Y and Z coordinates of the point.
We still need to define a few more things to obtain a model. For the sake of simplicity, we will give all the yarns the same cross sectional shape, width, height, etc... The easiest way to do this is to loop over the yarns and assign the same properties to each yarn one by one. The syntax for looping over Yarns is shown here:
# Loop over all the yarns in the list
for Yarn in Yarns:
Inside the loop, the variable Yarn refers to the current yarn in the list. So within the loop we just assign properties to Yarn and they will be applied to all the yarns in the list. In python the begining and end of a loop are defined by indentation, hence the following lines are indented to represent the contents of the loop.
Let us define periodic cubic spline interpolation between the nodes:
    # Set the interpolation function
    Yarn.AssignInterpolation(CInterpolationCubic())
This is done with the function AssignInterpolation which takes an instance of a class derived from CInterpolation. In this case we used CInterpolationCubic to specify periodic cubic spline interpolation.
Next we need to define a cross section for the yarn, to keep things simple a constant cross section all along the length of the yarn will be defined:
    # Assign a constant cross-section all along the yarn of elliptical shape
    Yarn.AssignSection(CYarnSectionConstant(CSectionEllipse(0.18, 0.04)))
The function AssignSection takes an instance of a class derived from CYarnSection. In this case we used CYarnSectionConstant which in turns take an instance of a class derived from CSection as a constructor. CSectionEllipse defines an elliptical cross section with given width and height defined by the first and second parameters respectively.
    # Set the resolution of the surface mesh created
    Yarn.SetResolution(20)
This line sets the resolution of the surface mesh created. The first parameter to the function SetResolution represents the number of points around a cross section. The number of points along the length of the yarns is automatically calculated such that the distance between points is similar to around the cross section.
Next we must add repeat vectors to define how the yarns are repeated.
    # Add repeat vectors to the yarn
    Yarn.AddRepeat(XYZ(0.44, 0, 0))
    Yarn.AddRepeat(XYZ(0, 0.44, 0))
The function AddRepeat takes an instance of the class XYZ. As we saw earlier the class XYZ is constructed with 3 numbers defining the X, Y and Z components.
Finally the yarn is fully defined, it can now be added to Textile:
    # Add the yarn to our textile
    Textile.AddYarn(Yarn)
This is the end of the loop, hence the following lines return to the original indentation. Now let's define a Domain within which the textile will be placed:
Textile.AssignDomain(CDomainPlanes(XYZ(0, 0, -0.02), XYZ(0.44, 0.44, 0.07)))
The function AssignDomain takes an instance of a class derived from CDomain. In this case we will create a box shaped domain, this can be accomplished by using the class CDomainPlanes. A box can be created by passing in opposite corners of the box (the minimum and maximum coordinates). This is done again with the class XYZ.
And finally Textile must be added to so that it can be rendered. Each Textile added must be assigned a name to identify it, this is the name that will appear at the top in the TexGen GUI. This name can either be generated automatically or we can specify it explicitly like so:
# Add the textile with the name "polyester"
AddTextile("polyester", Textile)
That's it! You now have the knowledge to create any type of fabric imaginable. Well, almost. The model created here is pretty simple, there is plenty of opportunity to create more complex shapes. For example non-constant cross sections can be defined, complex domain shapes defined by arbitrary planes, different interpolation functions.
Here is the completed script:
# Create a textile
Textile = CTextile()

# Create a python list containing 4 yarns
Yarns = [CYarn(), CYarn(), CYarn(), CYarn()]

# Add nodes to the yarns to describe their paths
Yarns[0].AddNode(CNode(XYZ(0, 0, 0)))
Yarns[0].AddNode(CNode(XYZ(0.22, 0, 0.05)))
Yarns[0].AddNode(CNode(XYZ(0.44, 0, 0)))

Yarns[1].AddNode(CNode(XYZ(0, 0.22, 0.05)))
Yarns[1].AddNode(CNode(XYZ(0.22, 0.22, 0)))
Yarns[1].AddNode(CNode(XYZ(0.44, 0.22, 0.05)))

Yarns[2].AddNode(CNode(XYZ(0, 0, 0.05)))
Yarns[2].AddNode(CNode(XYZ(0, 0.22, 0)))
Yarns[2].AddNode(CNode(XYZ(0, 0.44, 0.05)))

Yarns[3].AddNode(CNode(XYZ(0.22, 0, 0)))
Yarns[3].AddNode(CNode(XYZ(0.22, 0.22, 0.05)))
Yarns[3].AddNode(CNode(XYZ(0.22, 0.44, 0)))

# Loop over all the yarns in the list
for Yarn in Yarns:

    # Set the interpolation function
    Yarn.AssignInterpolation(CInterpolationCubic())

    # Assign a constant cross-section all along the yarn of elliptical shape
    Yarn.AssignSection(CYarnSectionConstant(CSectionEllipse(0.18, 0.04)))

    # Set the resolution of the surface mesh created
    Yarn.SetResolution(20)

    # Add repeat vectors to the yarn
    Yarn.AddRepeat(XYZ(0.44, 0, 0))
    Yarn.AddRepeat(XYZ(0, 0.44, 0))

    # Add the yarn to our textile
    Textile.AddYarn(Yarn)

# Create a domain and assign it to the textile
Textile.AssignDomain(CDomainPlanes(XYZ(0, 0, -0.02), XYZ(0.44, 0.44, 0.07)))

# Add the textile with the name "polyester"
AddTextile("polyester", Textile)
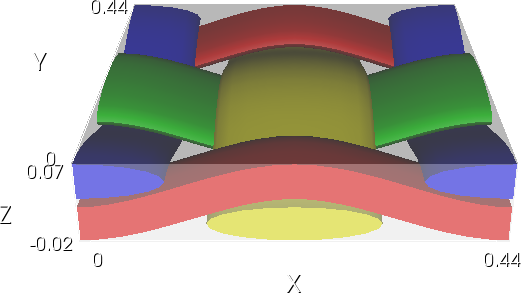
And the result:
Example 3: A 3d weave
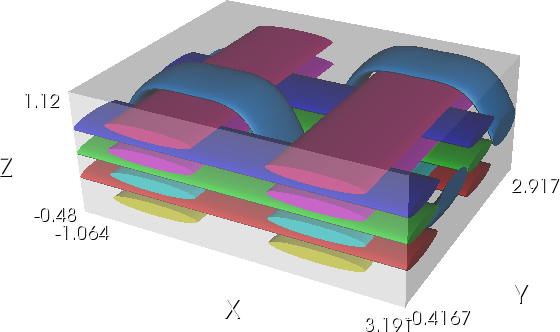
This example is similar to the Example 2 in that the yarns will be defined by nodes. This time we will create a 3d woven fabric that looks like this:
We start by defining a new CTextile instance:
# Create a textile
Textile = CTextile()
Before starting to define the geometry using TexGen it is helpful to define a list of parameters which may need to be changed later. These typically include spacing between yarns and yarn dimensions:
# Define some parameters
# Spacing between weft yarns
sx = 2
# Spacing between warp yarns
sy = 0.8
# Vertical distance between yarns at cross overs
sz = 0.16

# Width of the weft yarns is less than the weft spacing
weftyarnwidth = 1.2
# Width of the warp yarns set equal to the warp spacing
warpyarnwidth = sy
# Yarn height equal to the vertical distance between yarns at cross overs
yarnheight = sz
It is a good idea to define these up front rather than hard coding them in the rest of the script because if you want to tweak any parameters they can easily be located and will only need to be changed once. Lets start by defining the warp stuffer yarns, these are fairly easy to define since they all straight and parallel to each other:
# Create warp stuffer yarns
for i in range(3):
    yarn = CYarn()
    yarn.AddNode(CNode(XYZ(0, 0, 2*i*sz)))
    yarn.AddNode(CNode(XYZ(2*sx, 0, 2*i*sz)))

    yarn.AssignInterpolation(CInterpolationCubic())
    yarn.AssignSection(CYarnSectionConstant(CSectionEllipse(warpyarnwidth, yarnheight)))
    yarn.SetResolution(20)
    yarn.AddRepeat(XYZ(2*sx, 0, 0))
    yarn.AddRepeat(XYZ(0, 2*sy, 0))

    Textile.AddYarn(yarn)
Next we define the weft stuffer yarns, again these are easy to define:
# Create weft stuffer yarns
for i in range(4):
    yarn = CYarn()
    yarn.AddNode(CNode(XYZ(0, 0, (2*i-1)*sz)))
    yarn.AddNode(CNode(XYZ(0, 2*sy, (2*i-1)*sz)))

    yarn.AssignInterpolation(CInterpolationCubic())
    yarn.AssignSection(CYarnSectionConstant(CSectionEllipse(weftyarnwidth, yarnheight)))
    yarn.SetResolution(20)
    yarn.AddRepeat(XYZ(sx, 0, 0))
    yarn.AddRepeat(XYZ(0, 2*sy, 0))

    Textile.AddYarn(yarn)
And finally we need to insert the binder yarns. Making clever use of the repeat vectors it is only necessary to define a single instance of the binder yarn.
# Create warp binder yarns
top = 6*sz
bottom = -2*sz

oh = 0.5*weftyarnwidth+0.12
ov = 0.8*sz

yarn = CYarn()
yarn.AddNode(CNode(XYZ(0, sy, top)))
yarn.AddNode(CNode(XYZ(oh, sy, top-ov)))
yarn.AddNode(CNode(XYZ(sx-oh, sy, bottom+ov)))
yarn.AddNode(CNode(XYZ(sx, sy, bottom)))
yarn.AddNode(CNode(XYZ(sx+oh, sy, bottom+ov)))
yarn.AddNode(CNode(XYZ(2*sx-oh, sy, top-ov)))
yarn.AddNode(CNode(XYZ(2*sx, sy, top)))

yarn.AssignInterpolation(CInterpolationBezier())
yarn.AssignSection(CYarnSectionConstant(CSectionEllipse(warpyarnwidth, yarnheight)))
yarn.SetResolution(20)
yarn.AddRepeat(XYZ(2*sx, 0, 0))
yarn.AddRepeat(XYZ(sx, 2*sy, 0))

Textile.AddYarn(yarn)
Now that the geometry is defined we shall define a domain and add the textile so that TexGen knows about it.
Textile.AssignDomain(CDomainPlanes(XYZ(-0.5*sx,-0.5*sy,bottom-sz), XYZ(1.5*sx,3.5*sy,top+sz)))

# Add the textile to our TexGen singleton
AddTextile(Textile)
The completed scripts is shown below:
# Create a textile
Textile = CTextile()

# Define some parameters
# Spacing between weft yarns
sx = 2
# Spacing between warp yarns
sy = 0.8
# Vertical distance between yarns at cross overs
sz = 0.16

# Width of the weft yarns is less than the weft spacing
weftyarnwidth = 1.2
# Width of the warp yarns set equal to the warp spacing
warpyarnwidth = sy
# Yarn height equal to the vertical distance between yarns at cross overs
yarnheight = sz

# Create warp stuffer yarns
for i in range(3):
    yarn = CYarn()
    yarn.AddNode(CNode(XYZ(0, 0, 2*i*sz)))
    yarn.AddNode(CNode(XYZ(2*sx, 0, 2*i*sz)))

    yarn.AssignInterpolation(CInterpolationCubic())
    yarn.AssignSection(CYarnSectionConstant(CSectionEllipse(warpyarnwidth, yarnheight)))
    yarn.SetResolution(20)
    yarn.AddRepeat(XYZ(2*sx, 0, 0))
    yarn.AddRepeat(XYZ(0, 2*sy, 0))

    Textile.AddYarn(yarn)

# Create weft stuffer yarns
for i in range(4):
    yarn = CYarn()
    yarn.AddNode(CNode(XYZ(0, 0, (2*i-1)*sz)))
    yarn.AddNode(CNode(XYZ(0, 2*sy, (2*i-1)*sz)))

    yarn.AssignInterpolation(CInterpolationCubic())
    yarn.AssignSection(CYarnSectionConstant(CSectionEllipse(weftyarnwidth, yarnheight)))
    yarn.SetResolution(20)
    yarn.AddRepeat(XYZ(sx, 0, 0))
    yarn.AddRepeat(XYZ(0, 2*sy, 0))

    Textile.AddYarn(yarn)

# Create warp binder yarns
top = 6*sz
bottom = -2*sz

oh = 0.5*weftyarnwidth+0.12
ov = 0.8*sz

yarn = CYarn()
yarn.AddNode(CNode(XYZ(0, sy, top)))
yarn.AddNode(CNode(XYZ(oh, sy, top-ov)))
yarn.AddNode(CNode(XYZ(sx-oh, sy, bottom+ov)))
yarn.AddNode(CNode(XYZ(sx, sy, bottom)))
yarn.AddNode(CNode(XYZ(sx+oh, sy, bottom+ov)))
yarn.AddNode(CNode(XYZ(2*sx-oh, sy, top-ov)))
yarn.AddNode(CNode(XYZ(2*sx, sy, top)))

yarn.AssignInterpolation(CInterpolationBezier())
yarn.AssignSection(CYarnSectionConstant(CSectionEllipse(warpyarnwidth, yarnheight)))
yarn.SetResolution(20)
yarn.AddRepeat(XYZ(2*sx, 0, 0))
yarn.AddRepeat(XYZ(sx, 2*sy, 0))

Textile.AddYarn(yarn)

Textile.AssignDomain(CDomainPlanes(XYZ(-0.5*sx,-0.5*sy,bottom-sz), XYZ(1.5*sx,3.5*sy,top+sz)))

# Add the textile to our TexGen singleton
AddTextile(Textile)
Example 4: A 3D Orthogonal Weave
First a textile of type CTextileOrthogonal is created. The CTextileLayerToLayer, CTextileAngleInterlock and CTextileOffsetAngleInterlock classes can all be used in a similar way:
# Create an orthogonal textile with 6 warp and 4 weft yarns, 1.0 warp and weft spacing,
# warp height 0.35 and weft height 0.25. True/False selects refinement
Textile = CTextileOrthogonal( 6, 4, 1.0, 1.0, 0.35, 0.25, True)
The stack of yarn layers is added to the textile, typically alternating warp and weft(Y) layers. For the angle interlock a no yarn layer should be added at the bottom and a binder yarn layer at the top (these could be reversed if wished):
# Add yarn layers.  There must always be one NoYarn layer and one Bindery layer
Textile.AddNoYarnLayer()
Textile.AddYLayers()
Textile.AddWarpLayer()
Textile.AddYLayers()
Textile.AddWarpLayer()
Textile.AddYLayers()
Textile.AddBinderLayer()
The size and shape of the yarns is then specified:
# Adjust the yarn widths, heights and spacings
Textile.SetWarpYarnWidths( 3.6 )
Textile.SetWarpYarnHeights( 0.35 )
Textile.SetWarpYarnSpacings( 3.8 )
Textile.SetBinderYarnWidths( 1.375 )
Textile.SetBinderYarnHeights( 0.16 )
Textile.SetBinderYarnSpacings( 1.4 )
# Weft yarns
Textile.SetYYarnWidths(2.58)
Textile.SetYYarnSpacings(2.8)
# Set the power of the power ellipses used
Textile.SetWarpYarnPower(0.6)
Textile.SetWeftYarnPower(0.6)
Textile.SetBinderYarnPower(0.8)
The positions of the binder yarns are set. Calling the SwapBinderPosition function will toggle the binder yarn between the top and bottom layer:
# Binder yarns may only be at top/bottom position in orthogonal
# In this case the binder layer was created as the top layer so switching will place them at the bottom
Textile.SwapBinderPosition( 0,2)
Textile.SwapBinderPosition( 2,2)
Textile.SwapBinderPosition( 1,5)
Textile.SwapBinderPosition( 3,5)
A default domain is created to fit the textile. By default an extra 5% is added at the top and bottom:
# Create a default domain to fit the textile
Textile.AssignDefaultDomain()
If the refine option is being used then yarn properties must be specified. The target thickness is set and also a maximum volume fraction. The refine algorithm changes the cross-sections of the textile to achieve the target thickness, checking that the maximum volume fraction has not been exceeded where cross-sections are reduced. An error message will be displayed if the target thickness cannot be achieved without exceeding the maximum volume fraction specified:
# Set fibre properties
Textile.SetFibreDiameter( WARP, 0.007, "mm" )
Textile.SetFibreDiameter( WEFT, 0.007, "mm" )
Textile.SetFibreDiameter( BINDER, 0.007, "mm" )
Textile.SetFibresPerYarn( WARP, 5000 )
Textile.SetFibresPerYarn( WEFT, 8000 )
Textile.SetFibresPerYarn( BINDER, 3500 )
# Set the target thickness for the refined textile
Textile.SetThickness(1.4)
# Set the maximum volume fraction allowed in the refine process
Textile.SetMaxVolFraction(0.78)
# Reset the domain height to suit the refined textile
Textile.SetDomainZValues()
# Add the textile
AddTextile(Textile)
The complete script is shown below:
# Create an orthogonal textile with 6 warp and 4 weft yarns, 1.0 warp and weft spacing,
# warp height 0.35 and weft height 0.25. True/False selects refinement
Textile = CTextileOrthogonal( 6, 4, 1.0, 1.0, 0.35, 0.25, True)
# Set the ratio of warp/binder yarns
Textile.SetWarpRatio( 2 )
Textile.SetBinderRatio( 1 )
# Add yarn layers.  There must always be one NoYarn layer and one Bindery layer
Textile.AddNoYarnLayer()
Textile.AddYLayers()
Textile.AddWarpLayer()
Textile.AddYLayers()
Textile.AddWarpLayer()
Textile.AddYLayers()
Textile.AddBinderLayer()
# Adjust the yarn widths, heights and spacings
Textile.SetWarpYarnWidths( 3.6 )
Textile.SetWarpYarnHeights( 0.35 )
Textile.SetWarpYarnSpacings( 3.8 )
Textile.SetBinderYarnWidths( 1.375 )
Textile.SetBinderYarnHeights( 0.16 )
Textile.SetBinderYarnSpacings( 1.4 )
# Weft yarns
Textile.SetYYarnWidths(2.58)
Textile.SetYYarnSpacings(2.8)
# Set the power of the power ellipses used
Textile.SetWarpYarnPower(0.6)
Textile.SetWeftYarnPower(0.6)
Textile.SetBinderYarnPower(0.8)
# Binder yarns may only be at top/bottom position in orthogonal
# In this case the binder layer was created as the top layer so switching will place them at the bottom
Textile.SwapBinderPosition( 0,2)
Textile.SwapBinderPosition( 2,2)
Textile.SwapBinderPosition( 1,5)
Textile.SwapBinderPosition( 3,5)
# Create a default domain to fit the textile
Textile.AssignDefaultDomain()
# Set fibre properties
Textile.SetFibreDiameter( WARP, 0.007, "mm" )
Textile.SetFibreDiameter( WEFT, 0.007, "mm" )
Textile.SetFibreDiameter( BINDER, 0.007, "mm" )
Textile.SetFibresPerYarn( WARP, 5000 )
Textile.SetFibresPerYarn( WEFT, 8000 )
Textile.SetFibresPerYarn( BINDER, 3500 )
# Set the target thickness for the refined textile
Textile.SetThickness(1.4)
# Set the maximum volume fraction allowed in the refine process
Textile.SetMaxVolFraction(0.78)
# Reset the domain height to suit the refined textile
Textile.SetDomainZValues()
# Add the textile
AddTextile(Textile)
Example 5: A sheared plain weave
This example builds on Example 2, except this time we will be modeling a sheared unit cell. The final script can be found at the bottom, I will not step through each section of case as I have done for the previous cases since you should now be familiar with the basic procedure.
You will notice at the top of the script the line from math import *, this is a Python command to import the contents of the math module. We need this here because we will be making use of the value pi and functions cos and sin.
In this script I have also defined some constants up front (spacing, height, shear angle, twist angle and shear offset) as they will get used frequently within the script. It is best to define them as variables so that they can easily be modified later.
The position of the nodes are arranged as plain weave but displaced slightly by the shear offset. Note that if the shear angle is 0, the shear offset is also 0 and the position of the nodes is equivalent to Example 2.
The next difference is how the cross-section is defined. When a plain woven fabric is sheared the yarn is likely to twist, so we can no longer use a constant cross-section all along the length of the yarn. Instead here I have defined a yarn which twists in one direction at 1/4 of its way along the length of the yarn and twists in the other direction at 3/4 of the way along the length of the yarn. This is to avoid intersections between the yarns. The cross-section is interpolated at other positions along the yarn.
The repeat vectors are defined to take into account the shear and is fairly straight forwards.
The next complication is defining a domain which is sheared. This is done by specifying 6 planes which define the bounds of the domain. The normals of the planes must point inwards, in the case of an unsheared fabric the normals are all in line with the global axes. But in order to create a lozenge shaped unit cell these normals must be rotated.
from math import *

# Create a textile
Textile = CTextile()

# Create a python list containing 4 yarns
Yarns = [CYarn(), CYarn(), CYarn(), CYarn()]

# Define some constants that will be used in further calculations
spacing = 0.22
height = 0.05

shearAngle = pi/16
twistAngle = shearAngle

shearOffset = spacing*sin(shearAngle)


# Add nodes to the yarns to describe their paths, these are the sheared node positions
Yarns[0].AddNode(CNode(XYZ(0, 0, 0)))
Yarns[0].AddNode(CNode(XYZ(spacing, shearOffset, height)))
Yarns[0].AddNode(CNode(XYZ(2*spacing, 2*shearOffset, 0)))

Yarns[1].AddNode(CNode(XYZ(0+shearOffset, spacing, height)))
Yarns[1].AddNode(CNode(XYZ(spacing+shearOffset, spacing+shearOffset, 0)))
Yarns[1].AddNode(CNode(XYZ(2*spacing+shearOffset, spacing+2*shearOffset, height)))

Yarns[2].AddNode(CNode(XYZ(0, 0, height)))
Yarns[2].AddNode(CNode(XYZ(shearOffset, spacing, 0)))
Yarns[2].AddNode(CNode(XYZ(2*shearOffset, 2*spacing, height)))

Yarns[3].AddNode(CNode(XYZ(spacing, 0+shearOffset, 0)))
Yarns[3].AddNode(CNode(XYZ(spacing+shearOffset, spacing+shearOffset, height)))
Yarns[3].AddNode(CNode(XYZ(spacing+2*shearOffset, 2*spacing+shearOffset, 0)))

# Create a cross-section which twists along the length of the yarn to accommodate the sheared fabric architecture
ellipse = CSectionEllipse(0.18, 0.04)
sectionTwist1 = CYarnSectionInterpPosition()
sectionTwist1.AddSection(0.25, CSectionRotated(ellipse, -twistAngle))
sectionTwist1.AddSection(0.75, CSectionRotated(ellipse, twistAngle))
sectionTwist2 = CYarnSectionInterpPosition()
sectionTwist2.AddSection(0.25, CSectionRotated(ellipse, twistAngle))
sectionTwist2.AddSection(0.75, CSectionRotated(ellipse, -twistAngle))

for Yarn in (Yarns[1], Yarns[3]):
    Yarn.AssignSection(sectionTwist1)
for Yarn in (Yarns[0], Yarns[2]):
    Yarn.AssignSection(sectionTwist2)

# Loop over all the yarns in the list
for Yarn in Yarns:
    # Set the resolution of the surface mesh created
    Yarn.SetResolution(20)

    # Add repeat vectors to the yarn
    Yarn.AddRepeat(XYZ(2*spacing, 2*shearOffset, 0))
    Yarn.AddRepeat(XYZ(2*shearOffset, 2*spacing, 0))

    # Add the yarn to our textile
    Textile.AddYarn(Yarn)

# Create a sheared domain with 6 planes
domain = CDomainPlanes()
d = (2*spacing-2*shearOffset*sin(shearAngle))/sqrt(1+sin(shearAngle)**2)
domain.AddPlane(PLANE(XYZ(1, -sin(shearAngle), 0), 0))
domain.AddPlane(PLANE(XYZ(-1, sin(shearAngle), 0), -d))
domain.AddPlane(PLANE(XYZ(-sin(shearAngle), 1, 0), 0))
domain.AddPlane(PLANE(XYZ(sin(shearAngle), -1, 0), -d))
domain.AddPlane(PLANE(XYZ(0, 0, 1), -height))
domain.AddPlane(PLANE(XYZ(0, 0, -1), -2*height))
Textile.AssignDomain(domain)

# Add the textile with the name "polyester"
AddTextile("polyester", Textile)
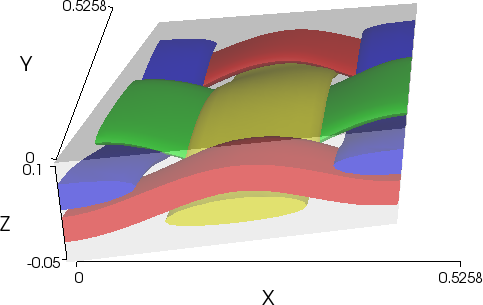
Once you run the script your model should look like this:
Example 6: A layered textile
This example shows how two textiles can be combined into one textile using the CLayeredTextile class.
First create a textile, in this case a 4x4 satin weave:
# Create a 4x4 satin weave with yarn spacing of 1 and thickness of 0.2
weave = CTextileWeave2D(4, 4, 1, 0.2, 1, False)
weave.SetGapSize(0)

# Set the weave pattern
weave.SwapPosition(0, 3)
weave.SwapPosition(1, 2)
weave.SwapPosition(2, 1)
weave.SwapPosition(3, 0)
# Adjust the yarn widths and heights
weave.SetYarnWidths(0.8)
weave.SetYarnHeights(0.1)
Create the default domain for the textile. The x,y dimensions of the domain of the combined textile will be those of this weave. The z dimension will be altered to include the other layer:
# Assign the domain and get its limits
weave.AssignDefaultDomain()
Now create a textile of type CTextileLayered. An offset can be specified. The x,y offset will be relative to the domain origin and the z offset will be relative to the lower surface of the bottom layer. This is the first layer so the z offset is zero:
# Create a layered textile
LayeredTextile = CTextileLayered()
# Add the first layer with specified offset
Offset = XYZ(0.25, 0.5, 0)
LayeredTextile.AddLayer( weave, Offset )
Next create the weave pattern for the second layer, in this case a plain weave:
# Create 2nd textile: Plain weave, spacing of 1 and thickness 0.25
weave1 = CTextileWeave2D(2, 2, 1, 0.25, 1, False)
weave1.SetGapSize(0)
weave1.SetYarnWidths(0.8)
weave1.SwapPosition(0, 1)
weave1.SwapPosition(1, 0)
weave1.SetXYarnWidths(0, 1.0)
weave1.SetXYarnHeights(0, 0.15)
weave1.SetXYarnSpacings(0, 1)
weave1.SetXYarnWidths(1, 0.8)
weave1.SetXYarnHeights(1, 0.1)
weave1.SetXYarnSpacings(1, 1)
weave1.SetYYarnWidths(0, 0.8)
weave1.SetYYarnHeights(0, 0.1)
weave1.SetYYarnSpacings(0, 1)
weave1.SetYYarnWidths(1, 1.0)
weave1.SetYYarnHeights(1, 0.15)
weave1.SetYYarnSpacings(1, 1)
weave1.AssignDefaultDomain()
This weave must be offset so that it lies above the first weave. In this case it is offset by the height of the first weave:
# Offsets for second layer.  z offset is height of first textile
Offset = XYZ(0.4,0.2,0.2)
The offset is then applied to each node of the yarns and the yarns are then added to the layered textile:
# Add the second textile to the layered textile
LayeredTextile.AddLayer( weave1, Offset )
The domain is enlarged by the height of the domain of the second textile and this is then assigned for the layered textile:
# Get the size of the domain for the second textile
Domain1 = weave1.GetDefaultDomain()
Min = XYZ()
Max = XYZ()
Domain1.GetBoxLimits(Min, Max)
# Get the domain of the first textile
Domain = weave.GetDefaultDomain()
Plane = PLANE()
# Get the domain upper surface
index = Domain.GetPlane( XYZ(0,0,-1), Plane )
# Offset the domain to include the second textile
Plane.d -= Offset.z
Domain.SetPlane( index, Plane )
LayeredTextile.AssignDomain( Domain )
Finally the textile is added with the name "LayeredTextile":
# Add the textile with the name "LayeredTextile"
AddTextile("LayeredTextile", LayeredTextile)
The completed script is shown below:
# Create a 4x4 satin weave with yarn spacing of 1 and thickness of 0.2
weave = CTextileWeave2D(4, 4, 1, 0.2, 0, False)
weave.SetGapSize(0)

# Set the weave pattern
weave.SwapPosition(0, 3)
weave.SwapPosition(1, 2)
weave.SwapPosition(2, 1)
weave.SwapPosition(3, 0)

# Adjust the yarn widths and heights
weave.SetYarnWidths(0.8)
weave.SetYarnHeights(0.1)

# Assign the domain
weave.AssignDefaultDomain()

# Create a layered textile
LayeredTextile = CTextileLayered()

# Add the first layer with specified offset
Offset = XYZ(0.25, 0.5, 0)
LayeredTextile.AddLayer( weave, Offset );

# Create 2nd textile: Plain weave, spacing of 1 and thickness 0.2
weave1 = CTextileWeave2D(2, 2, 1, 0.25, 0, False)
weave1.SetGapSize(0)
weave1.SetYarnWidths(0.8)
weave1.SwapPosition(0, 1)
weave1.SwapPosition(1, 0)
weave1.SetXYarnWidths(0, 0.9)
weave1.SetXYarnHeights(0, 0.12)
weave1.SetXYarnSpacings(0, 1)
weave1.SetXYarnWidths(1, 0.8)
weave1.SetXYarnHeights(1, 0.1)
weave1.SetXYarnSpacings(1, 1)
weave1.SetYYarnWidths(0, 0.8)
weave1.SetYYarnHeights(0, 0.1)
weave1.SetYYarnSpacings(0, 1)
weave1.SetYYarnWidths(1, 0.9)
weave1.SetYYarnHeights(1, 0.12)
weave1.SetYYarnSpacings(1, 1)

weave1.AssignDefaultDomain()

# Offsets for second layer.  z offset is height of first textile
Offset = XYZ(0.4,0.2,0.2)

# Add the second textile to the layered textile
LayeredTextile.AddLayer( weave1, Offset )

# Get the size of the domain for the second textile
Domain1 = weave1.GetDefaultDomain()
Min = XYZ()
Max = XYZ()
Domain1.GetBoxLimits(Min, Max)

# Get the domain of the first textile
Domain = weave.GetDefaultDomain()
Plane = PLANE()
# Get the domain upper surface
index = Domain.GetPlane( XYZ(0,0,-1), Plane )
# Offset the domain to include the second textile
Plane.d -= Max.z - Min.z
Domain.SetPlane( index, Plane )

LayeredTextile.AssignDomain( Domain )

# Add the textile with the name "LayeredTextile"
AddTextile('LayeredTextile', LayeredTextile)
The finished textile is shown below:
Saving to TG3 file format
TexGen has its own file format for storing textile geometry with the extension .tg3. For more details on this file format please read the TG3 File Format page. Any textile models saved to this file format can be reloaded at a later time however it is also a good idea to keep the python script used to generate the geometry in case modifications need to be made. To save such a file it is simply a matter of adding an additional line at the end of your script like so:
SaveToXML("MyTextile.tg3")
The first parameter is the name of the file to save. Note that if the .tg3 extension is omitted then it will automatically be appended for you. The second parameter is optional and if used should be the name of the textile to save, this is useful if you have several textiles loaded at once (i.e. you called AddTextile more than once) and you only want to save one of them. Note that if you don't specify the second parameter and you do have several textiles loaded then it will save all of them to a single .tg3 file. The third parameter determines how much information is saved in the .tg3 file, see the TG3 File Format for more details.
